
How to Mount EFS on Multiple Instances
TO SHARE AN ELASTIC FILE SYSTEM WITH MULTIPLE INSTANCES


Thank you for taking time to go through my block. I hope this write-up will be helpful.
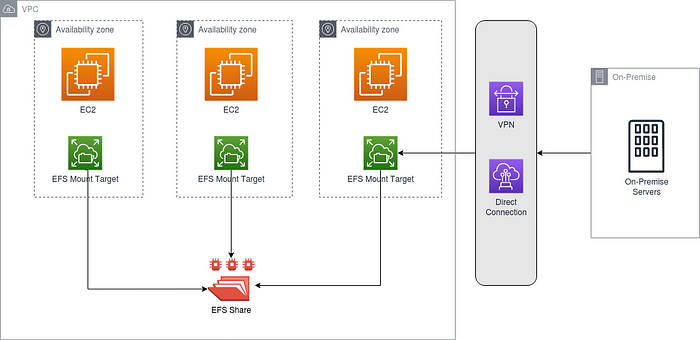
Amazon Elastic File System (EFS) is a cloud-based file storage service that allows users to share files without managing storage capacity. It can be used with AWS services and on-premises resources. EFS is the AWS implementation of NFS (Network File System) v4. It is a managed file storage, which can be mounted on only Linux-based operating systems. With its elastic storage capacity, it can grow and shrink automatically as you add and remove files from it providing read-after-write consistency. You can access your Amazon EFS file system by connecting multiple compute instances (EC2, ECS, Lambda) running in multiple AZs within a VPC in an AWS Region. Within the region, It can be connected to multiple VPCs as well via VPC Peering connections. If there is a need to access the EFS from an on-premise location, that also could be done via VPN or Direct Connect connections.
This diagram explain more better as you can see the multiple instances connected to the EFS and on-premise servers.
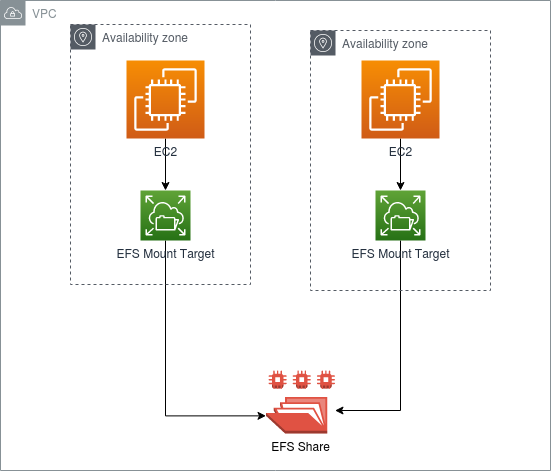
For the purpose of this class I will be working with two or three instances.
1. log into your Aws console and search for EFS

2. click on create file
enter file name.

click on customize
check on regional, check on Enable automatic backups,

check on Enable encryption of data at rest this option can only be done at this stage, it is a way of protecting your data when moving from one point to other.
accept all other default and click on Next
click on Next to accept all region availability

check on enforce in-transit encryption
click on Next

click on create

search on EC2 instance search bar, and open the EC2

click on launch instance, at this point you can launch at least two or three
note every steps on instance-1 apply to instance-2 to 3-4
click on launch instance
Give it a name [e.g my-EFS saver-1] the second server should be my-EFS server -2 this for easy identification of security ID

select operating system, example amazon Linux as it’s on above
go to the operating system dropdown and search for T3.micro, then select. if you are on free tier chose t2.micro

click on keypair and select default value [note this is for the purpose of this training, you can create your keypair]

go to network settings and click on edit
on security group name, remove the default name & input your own [e.g EFS SG] remember to differentiate the name on each of your instances for easy identification . Example EFS SG-1, EFS SG-2, EFS SG-3

launch your instances
click on successful launch ID

go to network and security, click on security groups to see your ID
click on default security ID

click on edit inbound rules
click on add rule


go to TCP search bar & search for NFS

go to custom search bar & search for the security group name you created [e.g EFS SG-1] or [EFS SG-2] and click
click on create
go to your instance and check the box for any the instance you want to launch [note all the instance you create will appear here]

click on connect at the top


click on connect again to open your terminal

type: sudo dnf install -y amazon-efs-utils then press enter

to create directory: sudo mkdir, enter your directory name press enter. Remember you are creating a directory to enable you mount the file system on that directory.
navigate to your instance tab and search for EFS
open it and click on attach

copy the first command under sudo mount helper

paste it on your terminal then enter. now from the screen below you will notice that the EFS has successfully mounted.

type: df -T then enter [this to know if successfully mounted your EFS]
to change ownership: sudo chown ec2-user & directory name[e.g sudo chown ec2-user efs/ ]

to create a file: sudo touch file name enter [e.g sudo touch efs.txt]
to enter into your directory: cd name of your directory then enter.
On your second instances, you are to only run this command once the terminal open: [a] sudo dnf install -y amazon-efs-utils, [b] mkdir name of the directory, and it must be the first directory name you created on the first instance [E.g mkdir Efsfolder] [c] go to EFS tab click on attach
and copy the same sudo mount command and paste it on the terminal, [d] run this command to know if successfully mounted: dt -T, [e] Run this command: cd and name of the directory E.g cd Efsfolder, [f] Run this command to see every file that has been created on the first instance: LS -L use lower case E.g ls -l


saver-1, saver-2, saver-3 these are connected to the EFS created.
to know how much space you have used: du -h
to see all the file you have created: Ls -al
I believe this will solve someone’s challenges, Thank you for take time to read through my block and look forward to dropping another piece of my project.
kindly drop your comment, like and share.